Bill of materials
The materials list computed from the placed layout — its five columns, the row and rebuild controls, and how it reaches the report and the exports.
The bill of materials — the BOM — is a materials list computed from the layout you have generated. It opens as a table beside the plot, every cell in it is editable, and the finished list prints as its own pages in the exported PDF report.
It is not a separate document you keep by hand. The quantities are read out of the plant, so a layout that changes and is generated again produces a different list. What you add on top of that — extra line items, corrected descriptions, remarks for a procurement team — is yours, and it stays until you ask for the list to be rebuilt.
Opening the list
📋 BOM on the plot toolbar switches the mode on. It is off by default. Generate a layout first: the list is computed from a placed plant, and there is nothing to compute before one exists.
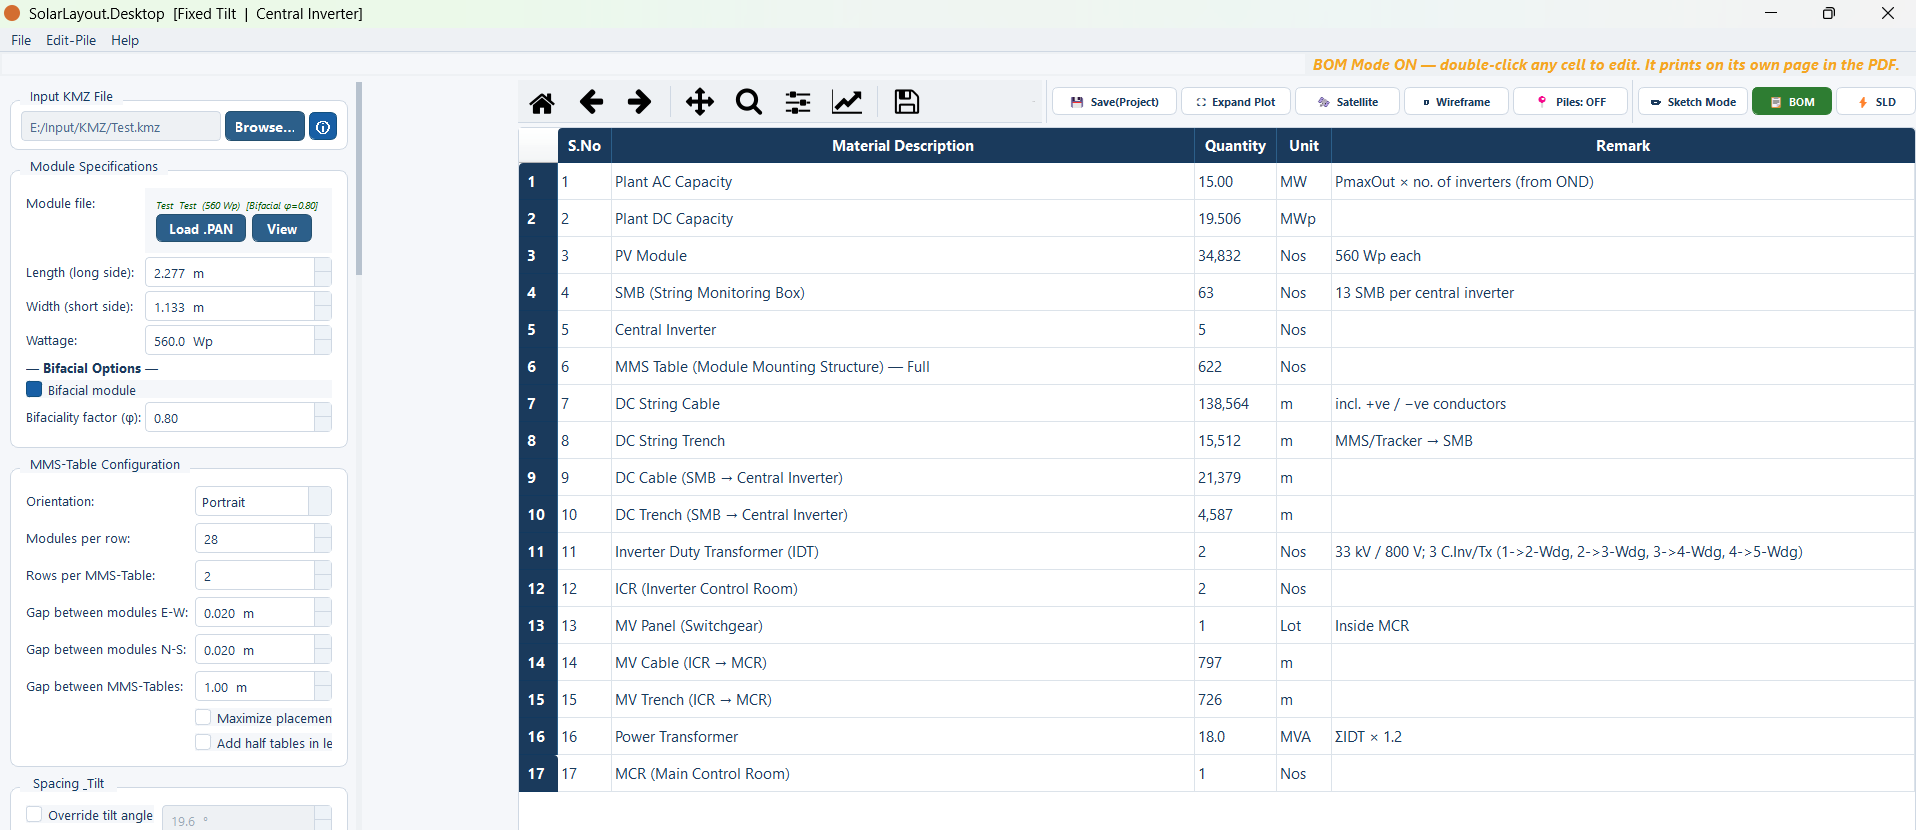
The list is part of the session, so it is saved into the project file along with the inputs, the layout and your sketch edits, and comes back when the project is reopened. See Projects.
The five columns
The table has a fixed set of columns, in this order.
| Column | What it holds |
|---|---|
| S.No | The line number, so a row can be referred to unambiguously in a purchase order or a query |
| Material Description | What the line item is |
| Quantity | How many, or how much |
| Unit | The unit the quantity is counted in |
| Remark | Free text — a specification, a make, a note to whoever prices the line |
Quantity and Unit are deliberately separate. A line counted in numbers and a line counted in metres sit in the same table without ambiguity, which matters as soon as cables and structures appear on the same list.
The controls
Three buttons sit above the table, and they do exactly what their labels say.
| Button | What it does |
|---|---|
| ➕ Add Row | Adds an empty row for you to fill in |
| 🗑 Delete Selected Row | Removes the row you have selected |
| ⚙ Rebuild from Layout | Discards the current list and computes a fresh one from the plant as it now stands |
What rebuilding does
⚙ Rebuild from Layout is not a refresh that merges. It recomputes the whole list from the current plant and puts that in place of what was there.
⚙ Rebuild from Layout discards your edits. Every row you added, every description you corrected and every remark you typed is replaced by the computed list. There is no merge and no partial rebuild — the plant's own figures are the whole of what comes back.
That is the behaviour you want in one specific situation and not in any other:
- Rebuild after you have changed the layout — moved a control room, drawn an obstruction, added or deleted tables by hand, turned cable calculation on, run the cleaning tool — and you want the quantities to match the plant again.
- Do not rebuild once you have started editing the list for real. Finish the layout first, rebuild once, then edit. The order costs nothing and saves the work.
If you need both — a fully edited list and a set of current quantities to check it against — export the edited list to a spreadsheet before rebuilding, then compare the two outside the application.
Editing a cell
Click any cell and type. Every column is editable, including the computed quantities — so a figure you overwrite is a figure you own from then on, and it stands until the list is rebuilt.
Three edits are worth making even on a list you otherwise leave alone:
- Descriptions. The computed text is generic. Replacing it with the designation your organisation buys against turns the list into something a supplier can quote from.
- Remarks. Cable specifications, connector types, structure grades and finishes — the detail the layout has no way of knowing.
- Missing line items. Anything the plant's geometry cannot imply. Read the computed list against your own material take-off and add what is not in it.
For a starting point that already has that detail written in, load one of the built-in templates rather than typing it from scratch. See Materials list templates.
Where the quantities come from
Two sources, and understanding the split tells you which figures move when you change the design.
The plant's own counts. Everything the layout has placed and measured is already known — the module count, the full and half tables or tracker units, the inverter control rooms, the string inverters or string monitoring boxes, the lightning arresters, the street lights, the piles, and the cable and trench lengths. These are the same figures the summary table reports under the plot, so the two never disagree. See Summary columns.
The topology rules. Some quantities are not placed on the ground and have to be derived from a rule instead. The switchgear and transformer counts are the clear case, and they follow three rules:
| Rule | Value |
|---|---|
| Inverters per ACCB | 15 |
| ACCBs per IDT | 4 |
| Maximum IDT rating | 17.2 MVA |
The IDT is the three-winding transformer in the diagram symbol set. The reason these three numbers matter here rather than only in the electrical design is that the single-line diagram's automatic build uses the same rules. Build the diagram from the plant and it groups inverters into ACCBs, ACCBs into transformers and transformers onto the medium-voltage panel by exactly the counts above — so the diagram and the materials list agree on how many of each there are. See Automatic diagram build.
What the list contains
The rows come out in a fixed order. A row whose quantity would be zero is left out altogether, so a short list is not a fault — it means the plant has none of that item.
| Description | Unit | What the remark column adds |
|---|---|---|
| Plant AC Capacity | MW | How it was derived from the inverter file. Shows a dash until one is loaded |
| Plant DC Capacity | MWp | — |
| PV Module | Nos | The wattage of each |
| String Inverter | Nos | The capacity of each |
| MMS Table — Full | Nos | — |
| Half MMS Table | Nos | That it is half length and carries half the strings |
| DC String Cable | m | That the figure includes both conductors |
| DC String Trench | m | Where the trench runs to |
| AC Cable (Inverter → ICR) | m | — |
| AC Trench (Inverter → ICR) | m | — |
| ACCB (AC Combiner Box) | Nos | The inverters-per-box limit |
| Inverter Duty Transformer (IDT) | Nos | The voltage pair, the units per transformer, and the winding progression |
| ICR (Inverter Control Room) | Nos | — |
| MV Panel (Switchgear) | Lot | That it sits inside the main control room |
| MV Cable (ICR → MCR) | m | — |
| MV Trench (ICR → MCR) | m | — |
| Power Transformer | MVA | How it was derived from the transformers feeding it |
| MCR (Main Control Room) | Nos | — |
| Lightning Arrester | Nos | — |
| Street Light (perimeter) | Nos | Pole height and spacing |
| Robotic Module Cleaning Equipment | Nos | The row count, and any robots added for broken lines or battery range |
| Cleaning Robot Bridge (table-to-table) | Nos | The standard span |
| Cleaning Robot Bridge (supported span) | Nos | That it crosses arresters, buildings or obstructions |
Four things change that list:
- A tracker plant replaces the two table rows with Tracker (Full) and Half Tracker.
- A central-inverter plant replaces String Inverter with SMB (String Monitoring Box) and Central Inverter, adds DC Cable (SMB → Central Inverter), and renames the second trench row to match — there is no AC leg. See Choosing a design mode.
- Running without cable calculation drops every cable and trench row.
- Not placing a main control room drops the five rows from the switchgear panel down to the room itself.
The cleaning robot fleet
The robot fleet is the one quantity that appears only because you asked for it.
Run 🤖 Robotic Module Cleaning, decide which wide gaps you will bridge, and
the resulting fleet size feeds both the summary's Robots column and this
list. Until you run it, there is no fleet on the list at all.
That is deliberate. A cleaning fleet is a purchase decision with a bridge count attached to it, not something a layout implies, so the list never carries a fleet you did not ask for. See Robotic module cleaning.
Exporting the list
Two exports, both of the list on screen rather than the computed one — whatever you have edited is what is written.
| Button | What you get |
|---|---|
| ⬇ Export BOM to Excel | The five columns as a spreadsheet, for pricing, sorting and merging into a wider procurement sheet |
| ⬇ Export BOM to PDF | The list as a document of its own, for circulation and sign-off |
⬇ Export BOM to PDF is separate from the report. The PDF report already carries the materials list as its own Bill of Material pages, paginated across as many pages as the list needs, alongside the drawing, the summary and the diagram. Use this button when you want the list on its own — a purchasing department rarely wants the engineering drawing attached to it. See The PDF report.
Enlarging the working area
Hide Layout & Energy Summary collapses the plot and the summary table so the materials list has the width of the window to itself. On a long list this is the difference between reading a row and scrolling to read a row.
The layout is unaffected — nothing is discarded, and switching the option off brings the plot and the summary straight back.
What the list is, and is not
State this to whoever receives it, because it sets what they can do with it.
- It is a materials list, not a priced bill of quantities. There is no rate column, no amount column and no total. Pricing happens after the export, in the spreadsheet.
- The descriptions are generic. They describe the item, not a supplier's catalogue part. Nothing here is tied to a make, a model or a stock code until you type one in.
- It follows from a layout, so it inherits the layout's assumptions. Cable quantities exist only if cable calculation was on for the run; a fleet exists only if you sized one; arresters exist only if you asked for them. A zero on this list is usually a setting rather than an absence.
- Nothing is checked against a standard. Quantities are counts and lengths, not a verified schedule of material.
A working order
The list is cheapest to produce if the plant is finished before you start editing it.
Finish the layout
Generate, place the main control room, draw any obstructions, and make your hand edits in Sketch Mode. See Sketch Mode.
Turn cable calculation on and generate again
Cable and trench lengths are only computed when you ask for them, and they are usually the largest quantities on the list. See Cable routing.
Size the cleaning fleet, if you want one
Run 🤖 Robotic Module Cleaning and settle the bridge decisions, so the fleet count is on the list before you rebuild.
Switch 📋 BOM on and rebuild once
⚙ Rebuild from Layout gives you a list that matches the finished plant.
Edit, then export
Correct the descriptions, add the line items the layout cannot know about, and export to a spreadsheet or a PDF. From here on, avoid rebuilding.
Where to go next
Materials list templates
The four built-in reference lists, and the action that replaces the computed one
Robotic module cleaning
Sizing the fleet that puts a robot count on this list
The PDF report
Where the materials list appears among the report's pages
Automatic diagram build
The topology rules this list shares with the single-line diagram
Exporting the diagram
Three routes out of diagram mode — the report's diagram page, a standalone PDF of the sheet, and a CAD drawing whose symbols are real entities.
Materials list templates
The four built-in reference materials lists, how to open one beside the computed list, and the action that replaces the computed list with it.