Materials list templates
The four built-in reference materials lists, how to open one beside the computed list, and the action that replaces the computed list with it.
A template is a complete materials list for a reference plant, written out in full and shipped with the application. You load one into a window of its own, edit it, and — if you want to — put it in place of the list computed from your layout.
Templates exist because the two lists know different things. The computed list knows the plant: how many tables were placed, how many control rooms, how long the cable runs are. A template knows the procurement detail a real materials list needs and a layout cannot infer.
Why a template is worth starting from
The computed list carries what the layout can measure. It cannot carry the rest, because nothing in a boundary file or a set of layout parameters implies it:
- Connector types — what mates with what at each junction.
- Cable specifications — the detail behind a length: what the conductor is, how it is sized, how it is insulated and protected.
- Earthing — the earthing material a plant needs, none of which the layout places.
- Conduit — protection and routing material for the cable runs.
A template already has lines of that kind written, described and unitised. Starting from one and correcting its quantities is faster and less error-prone than typing a procurement-grade list into an empty table.
The four built-in templates
Pick one from the BOM Template selector. Each name states the plant it was written for: its DC and AC capacity, its inverter topology, and its mounting type.
| Template | Capacity | Inverter topology | Mounting type |
|---|---|---|---|
| 30MWp_20MW_Central_FT | 30 MWp DC, 20 MW AC | Central Inverter | Fixed Tilt |
| 30MWp_20MW_String_FT | 30 MWp DC, 20 MW AC | String Inverter | Fixed Tilt |
| 26.65MWp_20MW_Central Inverter_SAT | 26.65 MWp DC, 20 MW AC | Central Inverter | Single Axis Tracker |
| 26.65MWp_20MW_String Inverter_SAT | 26.65 MWp DC, 20 MW AC | String Inverter | Single Axis Tracker |
Read the name and you know what is inside. FT is fixed tilt, SAT is a single-axis tracker, and the two capacities are the DC and AC ratings of the reference plant the list was written for.
Three things follow from the naming, and all three matter when you choose:
- The topology decides which line items exist at all. A String Inverter list carries string inverters and the AC side that follows them; a Central Inverter list carries string monitoring boxes and DC trunks instead, because the central inverter sits inside the control room and there is no distributed AC leg. The two lists are not versions of each other.
- The mounting type decides the structural lines. Fixed-tilt racking and a single-axis tracker are different structures with different material behind them, so the structural part of the list does not carry over between the two.
- The capacity only decides the quantities. Those you correct against your own plant anyway, so a capacity that does not match your design is the least important of the three mismatches.
Loading one
Switch 📋 BOM on
The materials list mode has to be open, because a template is loaded beside the computed list rather than instead of it. See Bill of materials.
Choose a template from BOM Template
Pick the one whose topology and mounting type match your design.
Click 📥 Load Template
The template opens in a separate window of its own, next to the computed list.
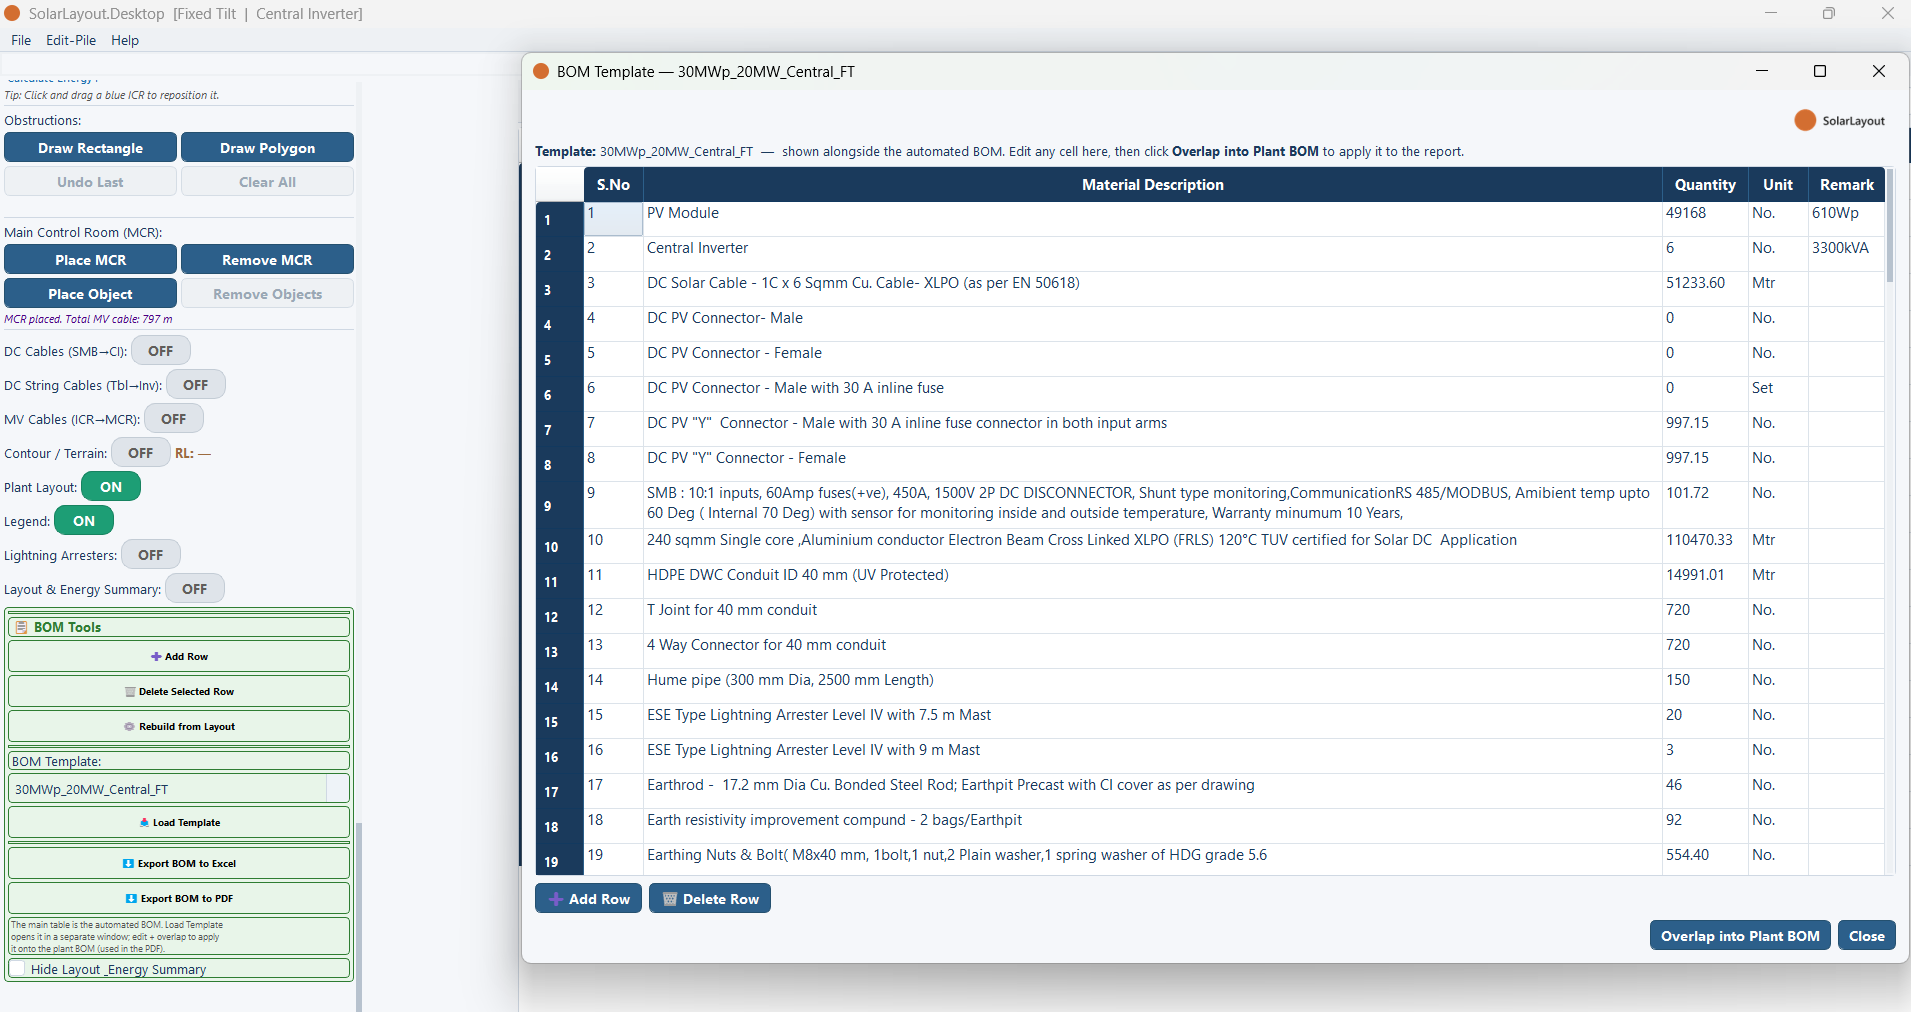
The template window is not modal. The main window stays live behind it, so you can move between the two, scroll each independently, and read a computed quantity straight across into the template. Arrange them side by side and the comparison is the whole point of the design: nothing you do in the template window touches the computed list until you explicitly ask for it.
Editing the template
The template window holds the same five columns as the computed list — S.No, Material Description, Quantity, Unit, Remark — and edits the same way. Click a cell and type.
What you normally change:
- Quantities, corrected against the computed list. This is the main work. The template's figures belong to its reference plant, not to yours.
- Descriptions and remarks, where your specification differs from the template's — a different cable size, a different structure grade, a make your organisation is standardised on.
- Line items, added or removed where your scope differs. A plant without street lighting does not need those lines; anything in your scope that the reference plant did not have is a line you add.
Everything the computed list can tell you is one window away while you do it: the table count, the control room count, the inverter or string monitoring box count, the arrester count, the pile count, and the cable and trench lengths.
Applying it to the plant
Overlap into Plant BOM is the consequential step on this page. Read this section before you click it.
After a confirmation, Overlap into Plant BOM replaces the computed list with the template's contents. The computed rows are gone — not merged, not kept alongside, not appended to.
Overlap into Plant BOM replaces the computed materials list, and the computed list is what prints in the report. After overlapping, the Bill of Material pages of the exported PDF carry the template's rows and quantities — including any quantity you have not yet corrected. Correct the template first, overlap second, export third.
The full chain of consequence, so none of it is a surprise:
| After overlapping | State |
|---|---|
| The materials list on screen | The template's rows |
| ⬇ Export BOM to Excel / ⬇ Export BOM to PDF | Writes the template's rows |
| The report's Bill of Material pages | Carry the template's rows |
| The plant, the layout, the summary table | Unchanged — only the list is replaced |
Getting the computed list back
⚙ Rebuild from Layout discards whatever is in the list and computes a fresh one from the plant. That is how you undo an overlap.
It is a full recompute rather than an undo, so it takes your edits with it as well as the template's rows. If there is anything in the current list you want to keep, export it to a spreadsheet before you rebuild.
Using a template in practice
The order below is the one that wastes the least work, because it settles the structural choices before the arithmetic.
Finish the layout and rebuild the computed list
You need real counts to correct a template against, so generate the plant, turn cable calculation on for the final run, and rebuild the computed list once. See Cable routing.
Load the template that matches your topology and mounting type
Topology and mounting type first — those decide which line items exist. Capacity is the least important match of the three.
Correct the quantities against the computed list
Work down the template with both windows open, replacing its reference-plant figures with your plant's counts and lengths.
Add what your scope has and the template does not
Then remove the lines your scope does not include.
Overlap into the plant list, then export
Only once the template reads correctly for your plant. Everything downstream — the spreadsheet, the standalone PDF, the report's materials pages — follows from this list. See The PDF report.
A last check worth making before you circulate the result: the template is a starting point, not a validated schedule of material for your plant. Nothing in the application checks a template's line items against your design, so a line the template carries and your plant does not need will sit there quietly until somebody reads it.
Where to go next
Bill of materials
The computed list, its columns, and the rebuild control
The PDF report
Where the materials list prints, and what else the report carries
Choosing a design mode
The topology and mounting choices a template has to match
Projects
Saving the session, including the materials list, to a project file
Bill of materials
The materials list computed from the placed layout — its five columns, the row and rebuild controls, and how it reaches the report and the exports.
The PDF report
The multi-page A3 report — the two export buttons, what each page carries, and what you must do before exporting for a page to appear at all.